
SensMonitor integration
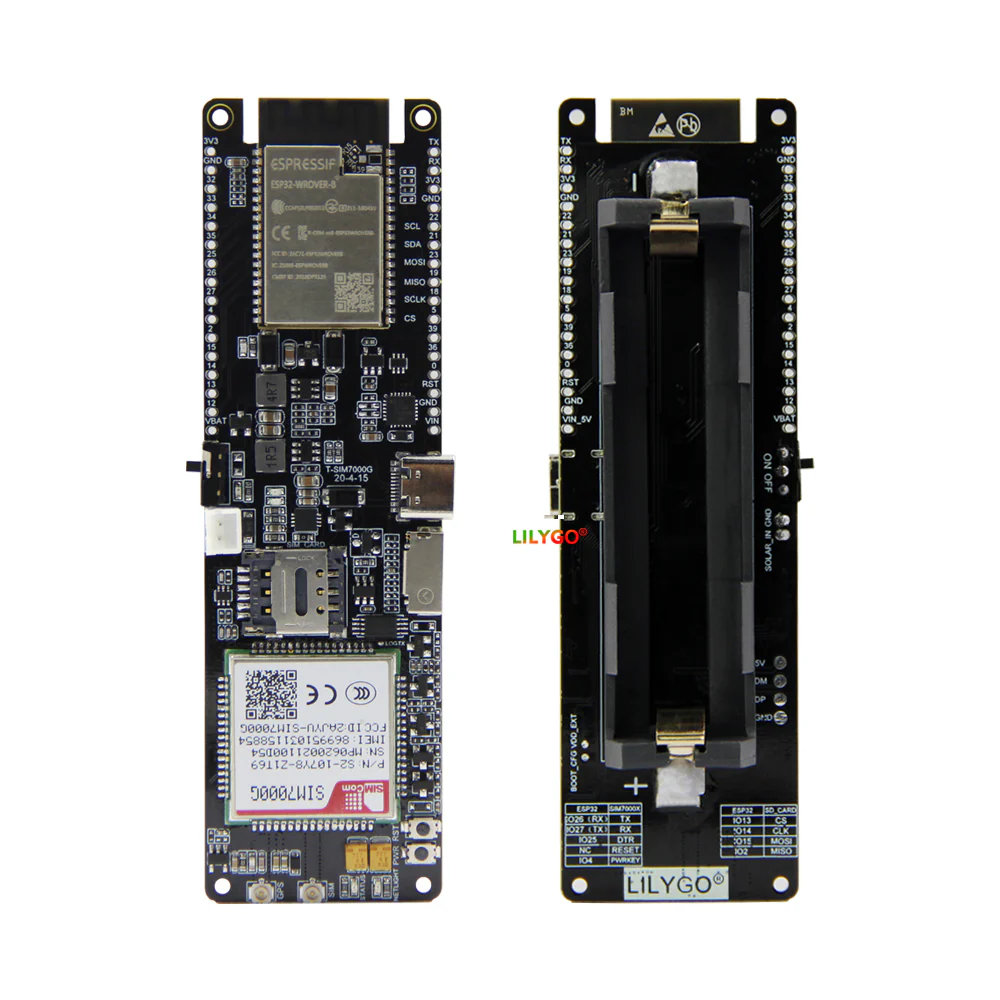
LilyGO T-SIM7000G
Connect an ESP32, SIM7000G cellular modem and BME280 sensor to the SensMonitor platform using the open-source smonitor-iot firmware.
- ESP32Wi-Fi and Bluetooth 4.2
- SIM7000GNB-IoT, LTE-M and GPRS
- BME280Temperature, humidity and pressure
01 / Overview
A field-ready cellular IoT node
The LilyGO T-SIM7000G combines an ESP32 microcontroller with a SIM7000G modem. It can send measurements from locations without Wi-Fi by using a cellular network and a TLS WebSocket connection to the SensMonitor platform.
Controller
ESP32 with 4 MB flash memory, Wi-Fi and Bluetooth connectivity.
Cellular network
SIM7000G supports NB-IoT, LTE-M and 2G/GPRS, depending on the mobile operator.
Power
USB-C, an 18650 battery or a suitable solar source through the board connector.
Sensor
The initial SensMonitor profile uses a BME280 connected over the I2C bus.
02 / Preparation
What you need
LilyGO T-SIM7000G board
Nano SIM card with an active data plan
LTE antenna connected before powering the modem
BME280 I2C module and four wires
USB-C cable that supports data transfer
Linux, macOS or Windows computer with Git
ESP-IDF 5.5.4 development environment
SensMonitor user account
03 / Hardware
Connect the BME280
The default profile uses GPIO 21 for SDA, GPIO 22 for SCL and the
I2C address 0x76. If your module uses
0x77, change the address later in the configuration.
| BME280 | LilyGO | Function |
|---|---|---|
VIN / VCC | 3.3V | Power |
GND | GND | Ground |
SDA | GPIO 21 | I2C data |
SCL | GPIO 22 | I2C clock |

Modem pins used by the firmware
These connections are already routed on the T-SIM7000G board and do not need to be wired manually.
04 / Firmware
Install and configure smonitor-iot
The project uses ESP-IDF 5.5.4. Internet access is required during the first build so that ESP-IDF Component Manager can download the SensMonitor components.
- 1
Install ESP-IDF 5.5.4
Follow the official Espressif instructions for your operating system, then open a terminal with the ESP-IDF environment activated.
ESP-IDF installation guide ↗ - 2
Download the firmware
git clone https://github.com/sensmonitor/smonitor-iot.git cd smonitor-iot idf.py set-target esp32 - 3
Configure the cellular network
idf.py menuconfigOpen the
SensMonitor IoTmenu and configure:- Mobile network APN — the operator APN is required.
- PPP authentication — usually
None. - Preferred mobile network — NB-IoT, LTE-M, GPRS or Automatic.
- LTE band — only when required by the operator; the initial profile uses band 20.
- 4
Check the sensor configuration
In
SensMonitor IoT → I2C sensor, keep BME280, SDA 21, SCL 22 and address 0x76 unless your wiring is different. - 5
Build and flash the firmware
idf.py build
idf.py -p /dev/ttyACM0 flash monitor
Replace
/dev/ttyACM0with your board’s serial port, such as/dev/ttyUSB0on Linux orCOM5on Windows.
05 / SensMonitor
Register the device
The firmware automatically derives a serial number from the factory ESP32 MAC address. The serial number identifies the device and is not a secret.
smonitor_iot: Device serial:
SM-ESP32-A1B2C3D4E5F6

DEVICE_NOT_REGISTERED:
Register SM-ESP32-A1B2C3D4E5F6
in the SensMonitor application.- 1
Sign in at app.sensmonitor.com.
- 2
Open the Devices section and choose to add a new device.
- 3
Select LilyGO T-SIM7000 as the device type.
- 4
Enter the serial number exactly as shown in the monitor, including the
SM-ESP32-prefix. - 5
Create a station, assign the device to it and configure the BME280 sensors.
- 6
Restart the board. The firmware will request the configuration again.
06 / Verification
What a successful connection looks like
BME280 initialized successfullyModem connected to PPP serverSystem time setWebSocket connectedReceived device configReceived device-sample-ackMessage: APN is empty
Run idf.py menuconfig, enter the APN in the SensMonitor IoT menu and build the firmware again.
PPP does not receive an IP address
Check the APN, active data plan, antenna, selected network type, radio band and PPP authentication.
BME280 does not initialize
Check the power supply, SDA/SCL wiring, pull-up resistors and sensor address 0x76 or 0x77.
WebSocket does not connect
First verify that PPP has an IP address and that the system time is synchronized. The production WebSocket URL is already configured by default.
Ready to measure?